Tutorial: Project Development
Our customer wants a tool to aid in production of motion pictures. In this part, we are going to set-up the project framework with empty ui components. Function is added in subsequent parts.
Step 1: Create UI Plugin
To create the a new plugin, open the wizard.
- File >> New >> Plug-in Development >> Plug-in Project >> Next >
Project name for the feature is com.acme.movie.ui. Next >. In the wizard you should know that you'll have a use for an activator, check that. Also know that the plug-in makes UI contributions, but is not a rich client application. Finish
Open the form editor from plugin.xml. From Overview page make sure This plug-in is a singleton.
Step 2: Create Perspective
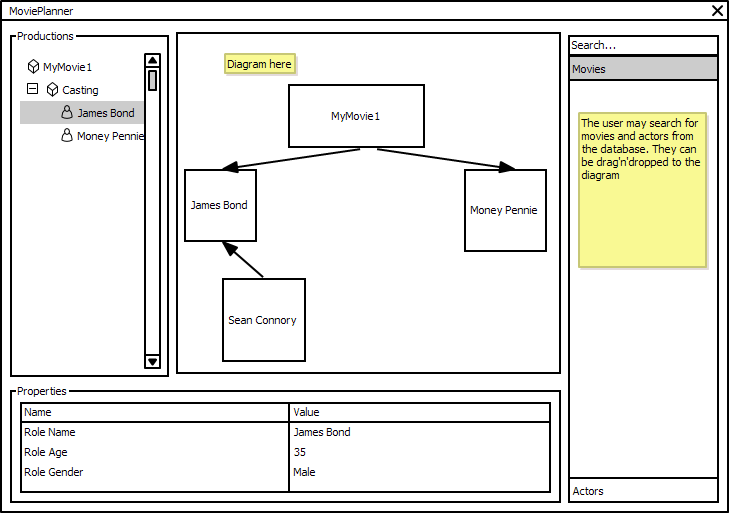
Perspective is a viewport to user interface. It is setting for how specific type of work is done in a project (Read More). Our application will have only one perspective, movie production perspective. There will be a model browser (left), an editor for diagram representations (center), a properties view (bottom) and a database view (right). Here is a sketch.
Let's start. Add Movie Production perspective.
- Open com.acme.movie.ui / META-INF/MANIFEST.MF >> Extensions
- Add a new extension, org.eclipse.ui.perspectives
- A node will appear, select it, right click new >> perspective. Select it.
- Fill in the fields on the right:
- id = com.acme.movie.ui.perspective
- name = "Movie Production"
- class = com.acme.movie.ui.PerspectiveFactory
- Create perspective factory class. Click on the blue underlined "Class *:" link, a class instantiation wizard will open. Finish.
- Make the editor area permanently visible. Edit the class.
<syntaxhighlight lang="java">
   public class PerspectiveFactory implements IPerspectiveFactory {
     @Override
     public void createInitialLayout(IPageLayout layout) {
       layout.setEditorAreaVisible(true);
     }
   }
</syntaxhighlight>
The empty perspective needs content, let's start with the Model Browser. It should be located on the left-hand side as planned in the sketch. We are going to add a perspective extension that states that, in this perspective there is a Model Browser view that is located to the left of the editor area. FYI the identifier of the editor area is org.eclipse.ui.editorss.
To customize a model browser for the movie production case, we cannot directly use any existing view extension in our perspective. Therefore we need to create a new view extension to be able to parametrize the view properly later in the tutorial.
Add the new view extension.
- Add a new extension, org.eclipse.ui.views
- Add view category
- org.eclipse.ui.views >> right click >> new >> category
- id = com.acme.movie.ui.category
- name = Movie Production
- Add view
- org.eclipse.ui.views >> right click >> new >> view
- id = com.acme.movie.ui.productions
- name = Productions
- category = com.acme.movie.ui.category
- class = org.simantics.browsing.ui.swt.GraphExplorerView
Now that we have the Productions browser view, add it to the perspective.
- Add new extension org.eclipse.ui.perspectiveExtensions
- Put com.acme.movie.ui.perspective as targetID
- Add production browser
- com.acme.movie.ui.perspective >> right-click >> new >> view
- id = com.acme.movie.ui.productions
- relationship = left
- relative = org.eclipse.ui.editorss
- ratio = 0.2
- visible = true
- closable = false
Apply the same steps to add property view at the bottom.
- com.acme.movie.ui.perspective >> right-click >> new >> view
- id = org.simantics.browsing.ui.graph.propertyView
- relationship = left, org.eclipse.ui.editorss
- ratio = 0.7
- visible = true
- closable = false
And put symbol library to the right.
- com.acme.movie.ui.perspective >> right-click >> new >> view
- id = org.simantics.diagram.symbollibrary.managed
- relationship = left
- relative = org.eclipse.ui.editorss
- ratio = 0.6
- visible = true
- closable = false
Step 3: Create Feature
Feature is a set of plug-ins grouped into a single manageable unit. In the final release the application would be delivered as a Feature. Features can be installed from an update site using Simantics Project Manager (SPM).
Create feature
- Open wizard File >> New >> Plug-in Development >> Feature Project >> Next >
- Project name for feature is com.acme.movie.feature. Next >.
- The feature includes both com.acme.movie.ontology and .ui plugins, check those. Finish
Step 4: Create Product
But for development the feature is not enough, we need a product.
Create a new product configuration
- File >> New >> Plug-in Development >> Product Configuration >> Next >
- Select com.acme.movie.ui as parent folder and put Movie.product for filename. Finish
Create Product extension
- Open Movie.product
- Select New Product. A wizard will open. Leave Defining Plug-in as com.acme.movie.ui and Product ID product.
- Select org.simantics.workbench.application as Product Application. Finish.
- Open Movie.product and Overview tab sheet from the editor bottom.
- Add values for ID, Version and Name; say com.acme.movie, 1.0 and "Motion Picture Planner"
- Choose org.simantics.workbench.product as Product and org.simantics.workbench.application as Application
- Select "The product configuration is based on: features"
- Open Dependencies tab sheet from the editor bottom.
- Add org.simantics.sdk
- Add com.acme.movie.feature
- Save file.
Step 5: Simantics Feature
Simantics feature is an configuration extension. It is needed for automated management. See Project Development.
Add Simantics Project Feature
- Open UI plugin settings: org.com.acme.movie.ui >> plugin.xml
- Add some plug-in dependencies: Dependencies >> Required Plug-ins >> Add...
- org.simantics.project, org.simantics.db, org.simantics.utils, org.simantics.utils.datastructures
- Add org.simantics.project.feature extension: Extensions >> Add... >> org.simantics.project.feature
- id = com.acme.movie.feature
- label = Movie Production Feature
- published = true
- class = com.acme.movie.ui.ProjectFeature
Create Project Feature class and set the default perspective.
- Instantiate the class: click the blue class*. link to open a wizard. Finish
- Add method configure(). Note, you can automatically import dependency classes with (ctrl-shift-o, organize imports).
<syntaxhighlight lang="java">
public class ProjectFeature extends AbstractProjectFeature implements IProjectFeature {
@Override public void configure() throws ProjectException {
getProject().setHint(ProjectKeys.DEFAULT_PERSPECTIVE, "com.acme.movie.ui.perspective");
}
}
</syntaxhighlight>
Create install group.
- Open UI plugin's extensions: org.com.acme.movie.ui >> plugin.xml >> Extensions
- Select your feature Movie Production Feature
- Add installGroup right-click >> New >> installGroup
- id = com.acme.movie.feature.group
Step 6: Run it
OK, you have now a feature and a product configuration. Give it a go.
- Open Movie.product
- Click Launch an Eclipse application
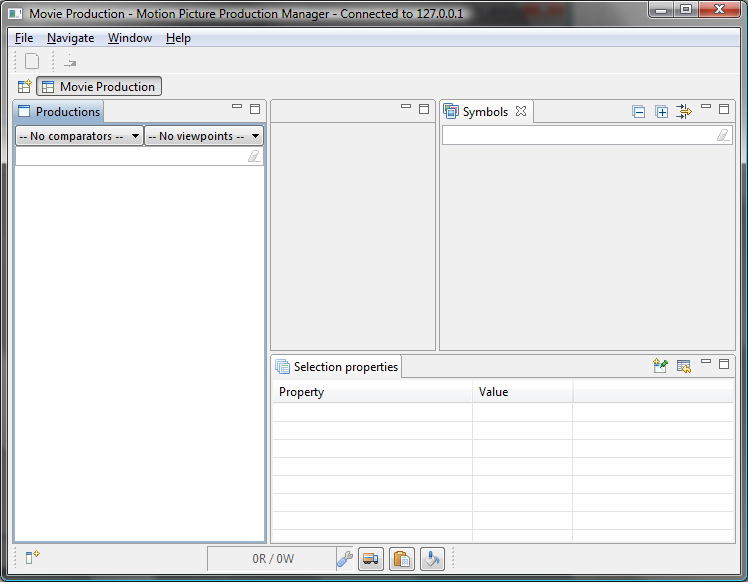
If everything goes fine a simantics platform should start and open up. It should look like this, if not, you can look for help in the tutorial source codes at https://www.simulationsite.net/svn/simantics/tutorials/trunk/
Amazing You have a simantics project!
In the next part you will be developing a model. ![]()
![]() Tutorial 3: Model Development
Tutorial 3: Model Development

